
Seeing Infrared
Continuing home experiments in motion picture photography

Having more or less painlessly excised all social media from my life (and you should too), I have to confess that a remaining digital vice of mine is lazily browsing Reddit. But at least on Reddit one has the option of participating in highly specified community forums where users connect over niche topics and trade information.
It was in one such community last fall where a Reddit user posted that they had discovered an infrared-sensitive film stock being produced by a factory in Ukraine, and they were thinking of organizing a group buy. They posted some of their own still images that looked promising to my eye, and I reached out.
Because the order was being placed directly with the factory, there was the option to have the film cut to basically any format or size, and while most other users in on the deal were there for still photography, I saw an opportunity to get ahold of infrared-sensitive motion picture film for my 16mm cameras. Infrared film has been used to very interesting cinematic effect (albeit rarely), and I’ve always wanted to have some on hand for any projects that lean toward the experimental. So in good faith I sent almost $500 to a complete stranger from the internet, and five months later, 800’ of film finally arrived at my house, from a war zone no less.
The goal of this article is to spend precisely $0 to test the film before using it on a significant project, and that presents a few DIY challenges, namely: how to expose it; how to develop it; how to scan it into the computer. But first:
0. What is Infrared?
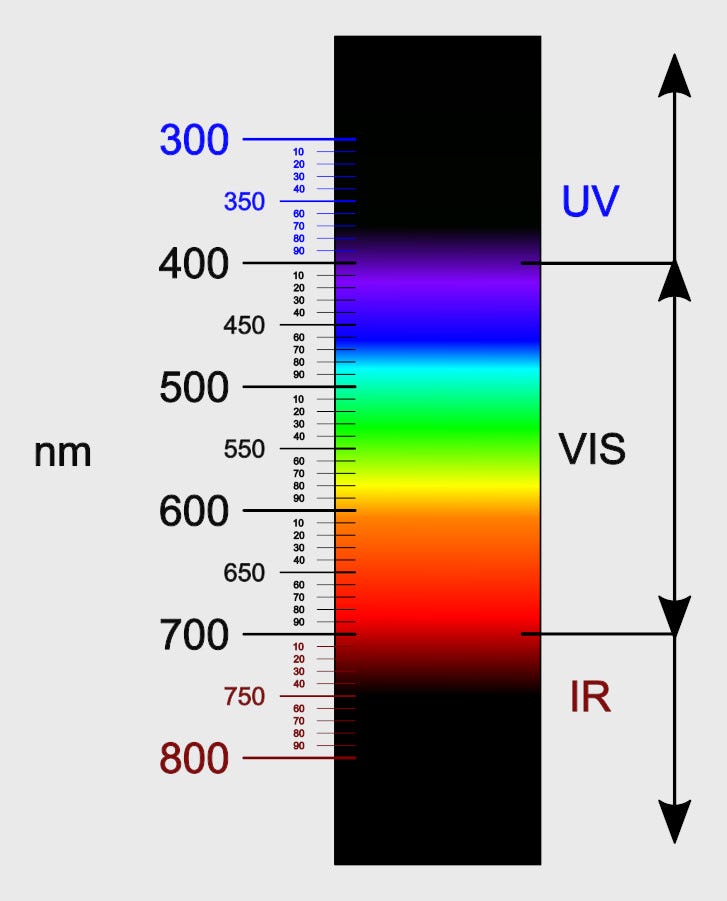
Light is electromagnetic radiation in the form of a wave—the same type of radiation as radio, cell phone signal, wireless internet, microwaves, and X-rays. What appears to us as visible light comprises a narrow frequency band between roughly 700 nanometers and 400 nanometers, and what appear to be different colors to our eyes are reflections (literally) of different lengths of waves.
As you can see from the chart above, waves that are shorter than 400nm cross from the visible spectrum to the ultraviolet spectrum and become invisible, and waves that are longer than 700nm cross into the infrared spectrum and do the same. As the waves get even longer, they cross into the microwave spectrum and can be sensed not as light but as heat.
Film is a chemical emulsion that is sensitive to radiation, and this can include more than just visible light—think of X-ray film, for example. When a film emulsion is said to be “infrared-sensitive,” it means that the emulsion is reactive to infrared light waves. Infrared waves, though not visible to our naked eyes, can thus be “seen” in the sense that they make a visible impression on the film. It’s just like how you can’t see someone’s skeleton, but that skeleton reflects X-rays which make an impression on X-ray film which, after developing, is visible to us. Infrared photographs can be eerie and dramatic: in black and white, things that reflect high amounts of infrared light, like foliage and skin, take on a bright white, marble quality. Things that do not reflect IR (or absorb it), like the sky or eyeballs, become dark.
But just because an emulsion is infrared-sensitive doesn’t mean that it only reacts to infrared light, and so in order to get these types of results, some extra preparation is necessary.
I. Preparation
I got this film in the mail and wanted to test it in a way that I could observe immediate results rather than having to shoot an entire roll of it, send it off to the lab ($$$), and wait up to a month to get a scan back. I realized that if I only ran a few feet through the camera, I could more than likely develop it at home with the equipment and chemicals I normally use for still photography. This could at least give me a sense of how the film behaves and what to expect when I prepare to use it for an actual project.
As mentioned above, just because a film is infrared-sensitive doesn’t mean that it won’t react to normal, visible light as well. You can shoot and develop IR film just like regular B&W film, and it will look mostly similar to other B&W images. The trick to achieving the surreal effect lies in blocking out all of the light from the visible spectrum and only exposing the film to IR waves. Enter the infrared filter.
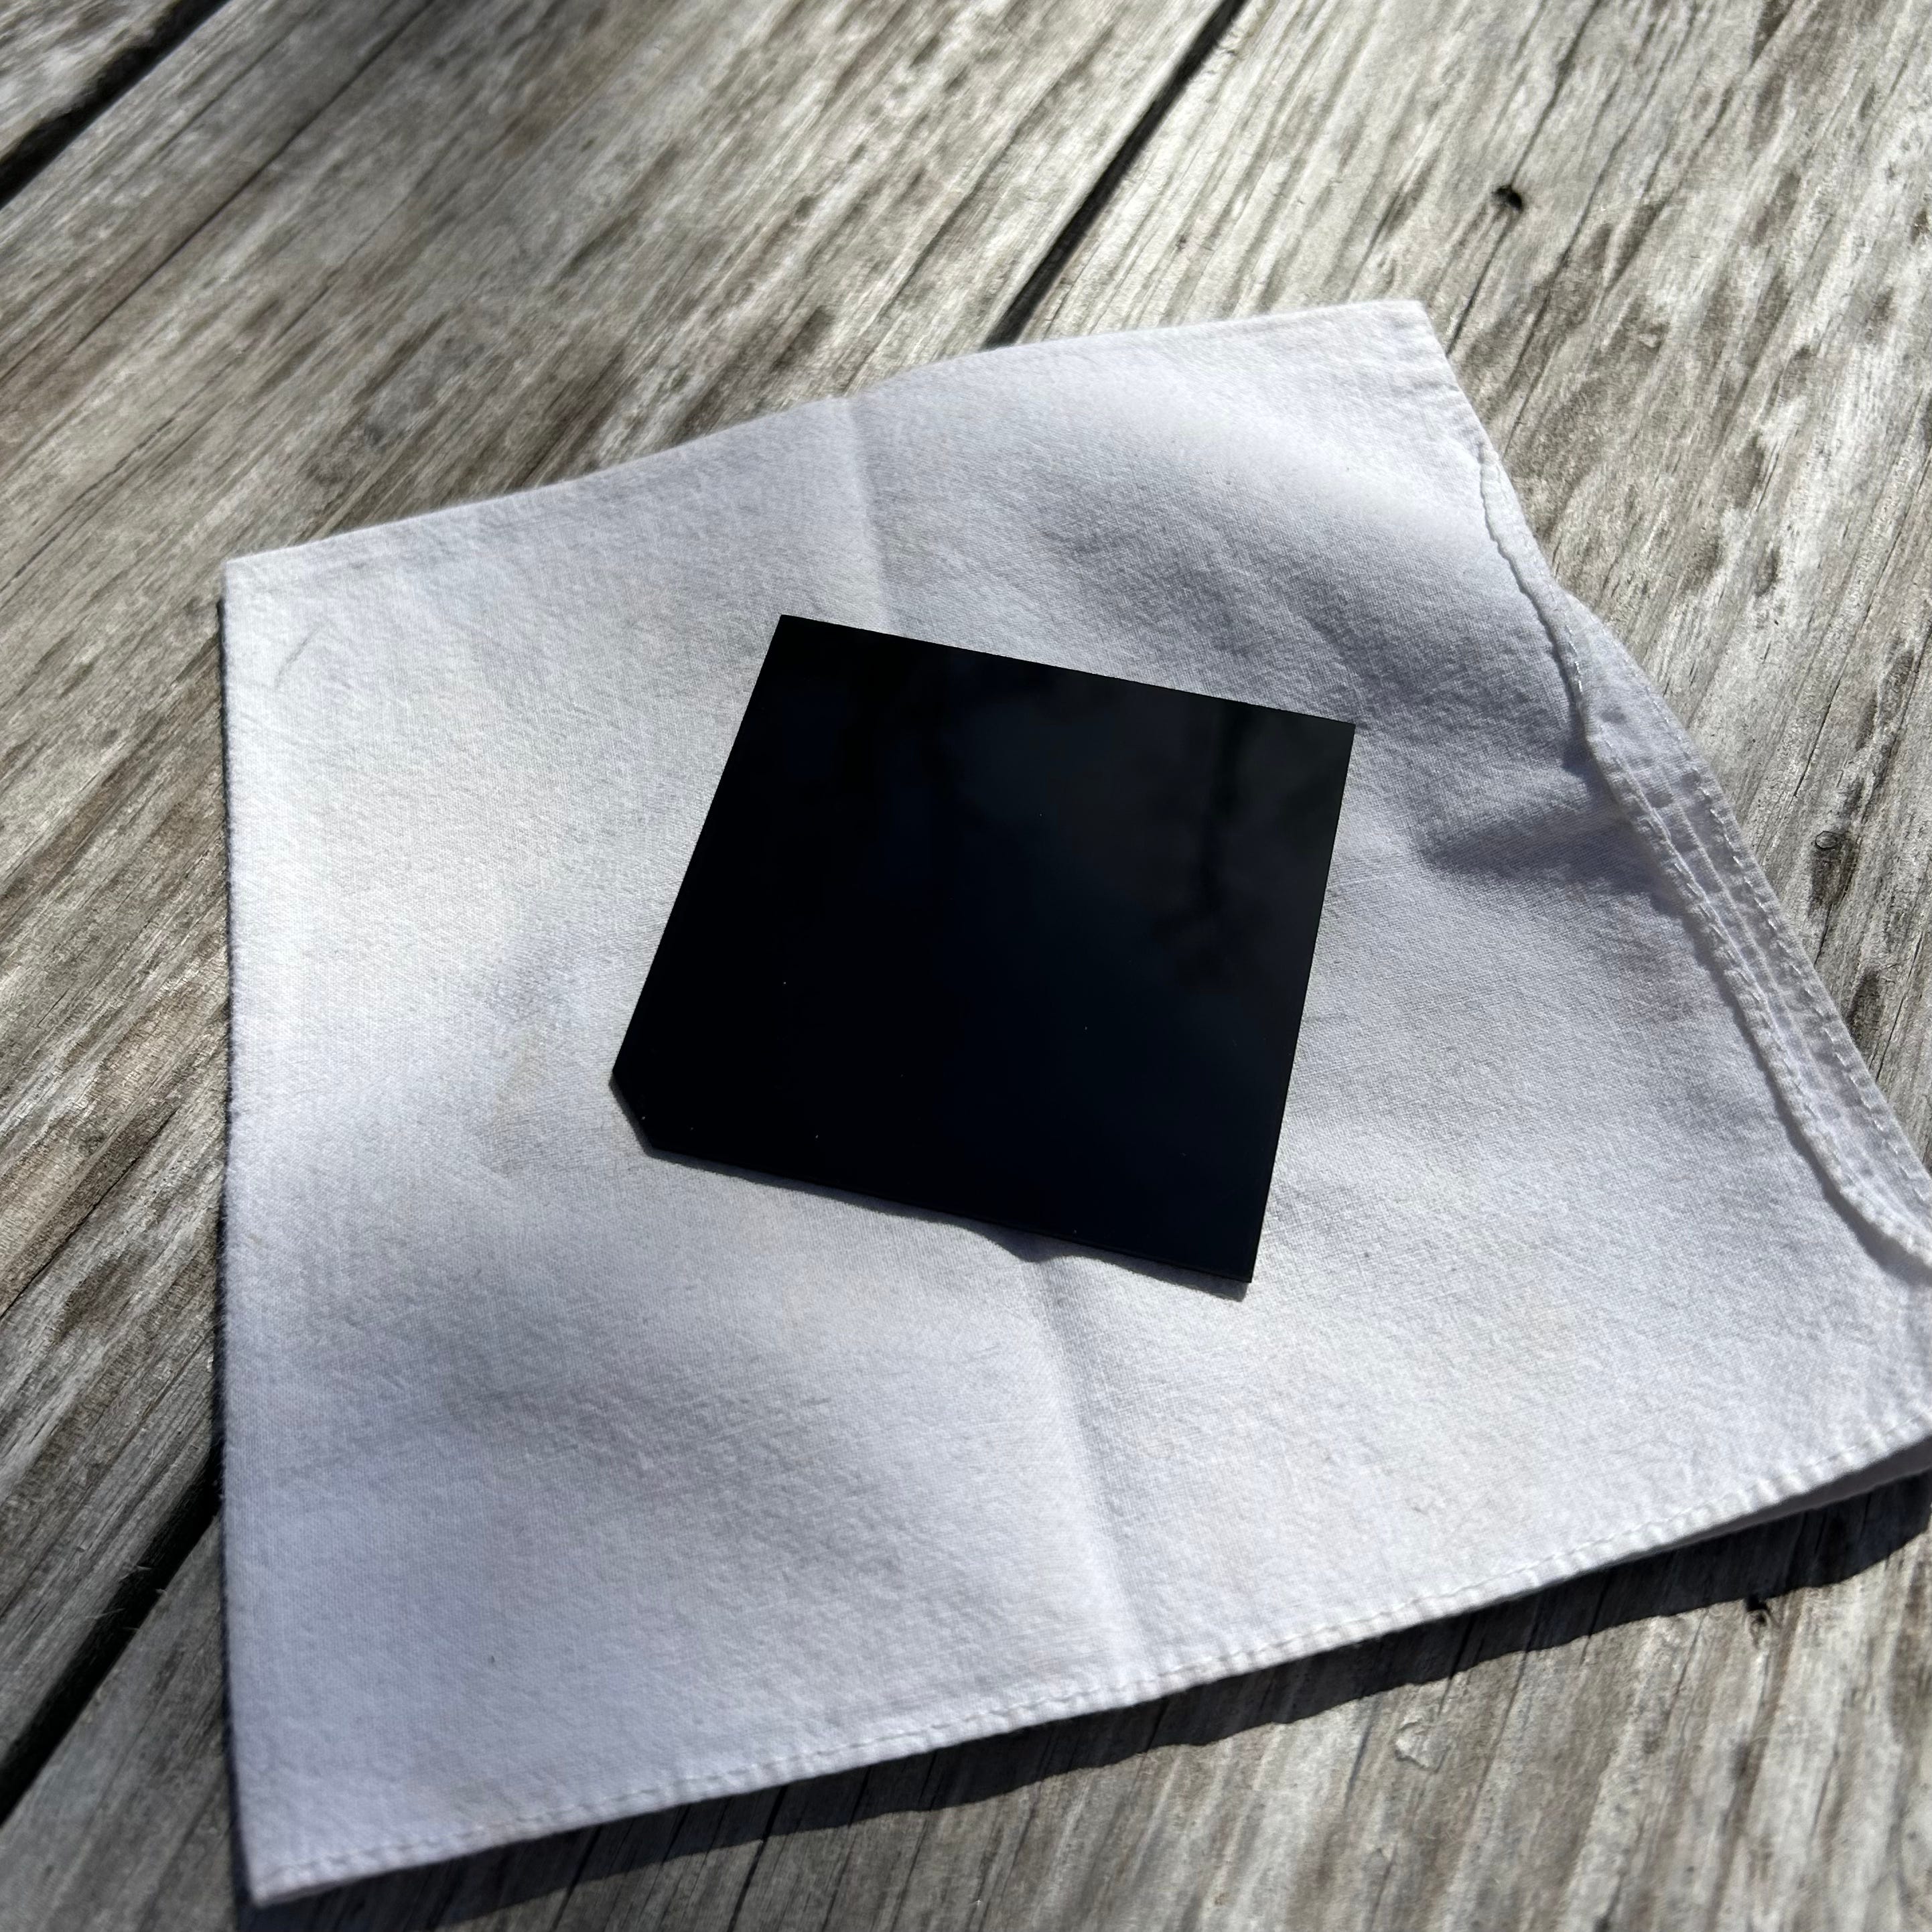
I knew that one of the challenges for shooting motion picture film would be finding an IR filter that would fit with my antiquated camera system. Most modern lenses use circular filters that screw into the front of the lens. The Arriflex 16BL uses 3”x 3” square glass filters that are clamped into a filter holder—this is the more common style for motion picture cameras, where different lenses are typically being swapped all day long between setups. The 3”x 3” square size is not ultra-rare in common colors like Red 25 or the Tungsten-correcting 85B, but specialty cases like IR are basically non-existent. All across the usual gear sites I was only finding circular screw-on filters. But around this time, I was hipped to the fabulous filterfind.net, and they sold me a square IR filter made of polycarbonate resin that didn’t break the bank and which I could cut down with a fine-toothed handsaw to the proper size for the Arri. First hurdle hurdled.
The next challenge would be exposure. You can see from the image above that to the naked eye, this filter is basically opaque. In fact, when held up to a bright light source, you can see that it’s a deep, deep red. As well as cutting out almost all of the visible light, the filter significantly darkens the image, and so you must adjust the exposure accordingly. The basic rule of thumb for an IR filter is to add five stops of light to the normal, filter-less exposure. Each stop is double (or half) the amount of light, so moving five stops in any direction represents a magnitude of 32 times! The Ukrainian film is rated at 200 ISO for normal exposure—adding five stops means rating it like a 6 ISO film.
The photographers reading this know that this is incredibly “slow” for a film. For still photography, that all but guarantees the use of long shutter speeds and the necessity of a tripod. But on motion picture cameras, the shutter speed is mechanically locked to the movement of the camera as it pulls the film through itself. If you want to shoot at 24fps and return an image with normal-seeming motion, your shutter speed is 1/50s. You could “undercrank” the camera, or run it at a slower speed and thus expose each frame for a longer period, but when played back at normal speed (24fps), the image would look fast and jerky. To picture this, think of early silent films where the actors seem to be zooming around. These early films were shot at any number of frame rates (usually 12fps or 18fps) before 24 was made the standard.
With the film speed baked in and the shutter speed locked in, the only way to increase the exposure, then, is to open the aperture of the lens and/or increase the amount of available light.
The latter factor is an easy one: because we are in search of infrared light to make an impression on this film, we need to make sure that the scene is lit with a source that includes infrared waves. For all practical intents and purposes, this source is necessarily the sun. And so it is basically a requirement that IR scenes be shot outdoors, in full, bright sun in order to produce the effects that we seek or indeed any image at all.
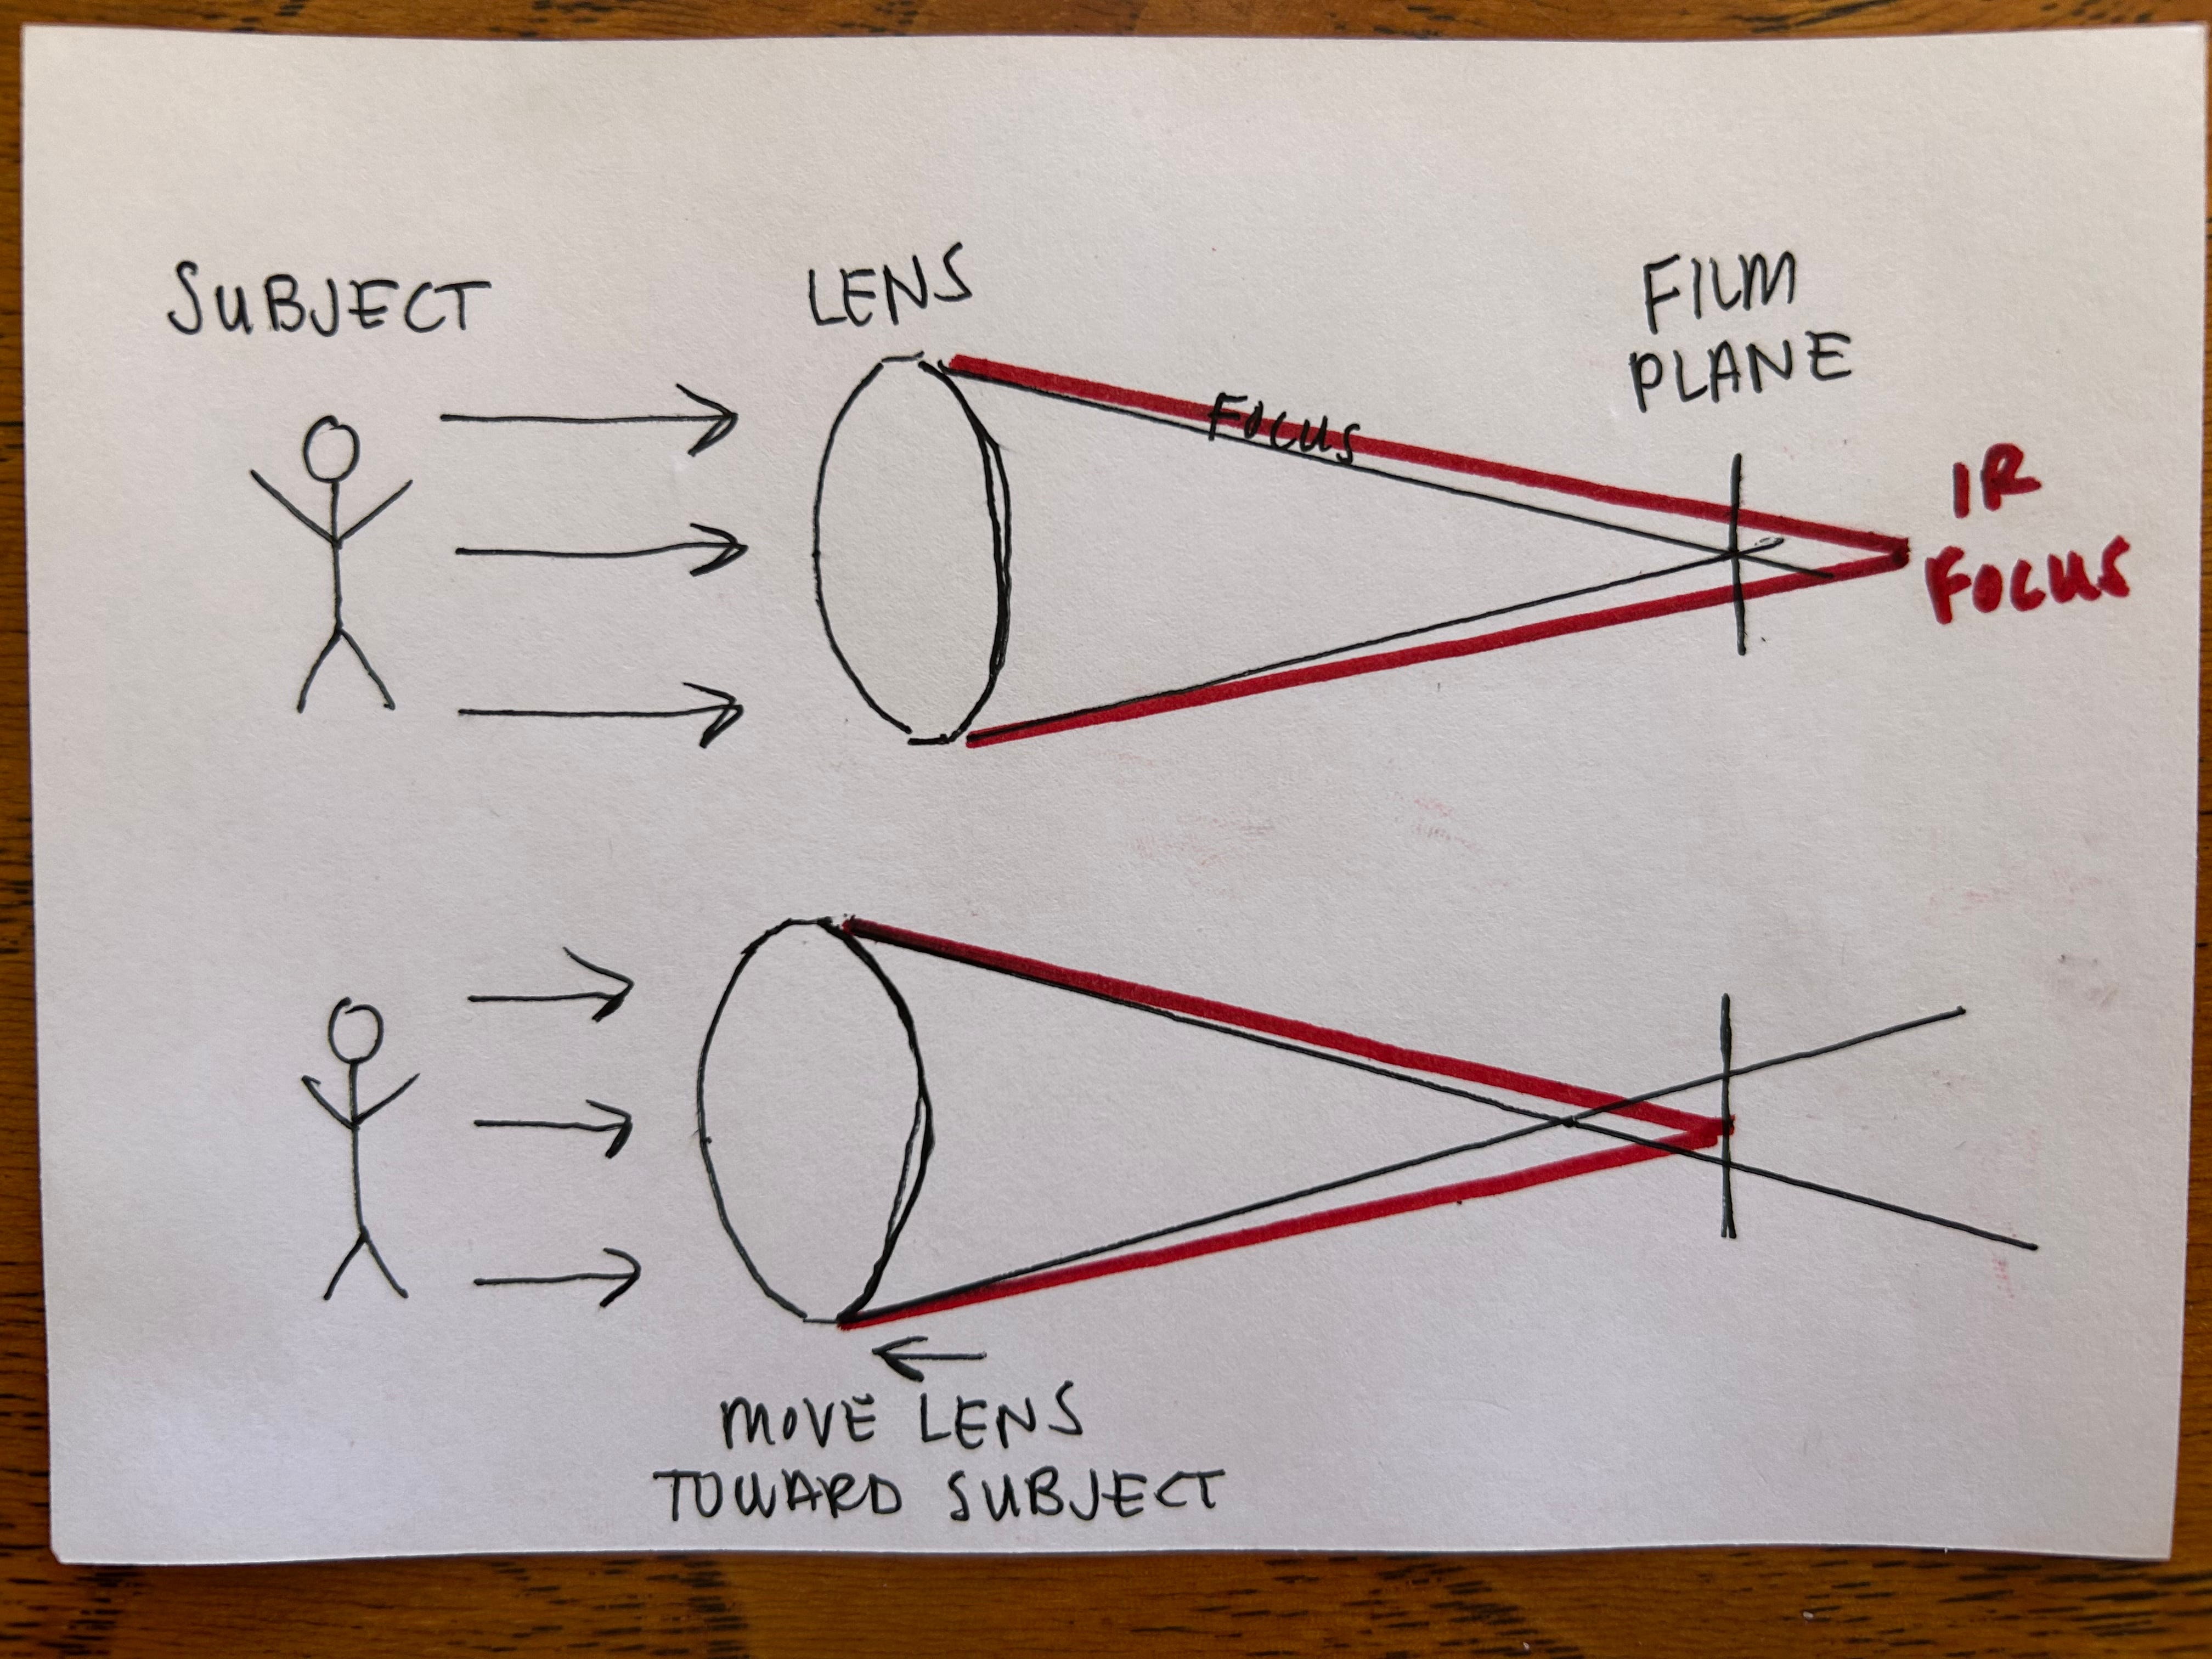
The other factor—opening the lens aperture—is complicated by the final consideration in our preparation: focus. Photographers also know that the wider a lens aperture is opened, the shallower the depth of focus. Not a big deal; this is how you get nice soft backgrounds in a portrait, for example. But IR light waves are actually long enough such that their point of focus is different than the visible light waves. How do you focus on light that you can’t even see? In fact, older analog camera lenses used to include a red dot on the focus scale to let the photographer know the correct adjustment to make. When shooting IR, you would focus as normal on the subject, and then turn the focus ring on the lens to align with the red dot on the scale. Practically speaking, this involves moving the “visible” focus point nearer to the camera, i.e. extending the lens. (one article I read suggested that the adjustment is roughly equal to 1/400th of the focal length of the lens; very minor, but critical).
The motion picture camera lens has no such indicator on it, and it’s complicated by the fact that the stock lens is a zoom lens, meaning that at different focal lengths (different zooms) the IR focus adjustment would be different. The only way that I could think to hedge the focus, then, would be to eyeball the focus just on the near side of being sharp, and then keep the aperture only as wide as necessary to get a good exposure on the film, hoping that the depth of field provided by that aperture is deep enough to capture the subject in focus.
Oh yeah, and once the filter is on the front of the camera, you can’t see through it anymore! With that in mind, it was time to begin the experiment.
II. The Experiment: Exposure
The first thing to do was to wrangle my reluctant partner away from her actual desk job and expose a few feet of film in the bright mid-day sun.
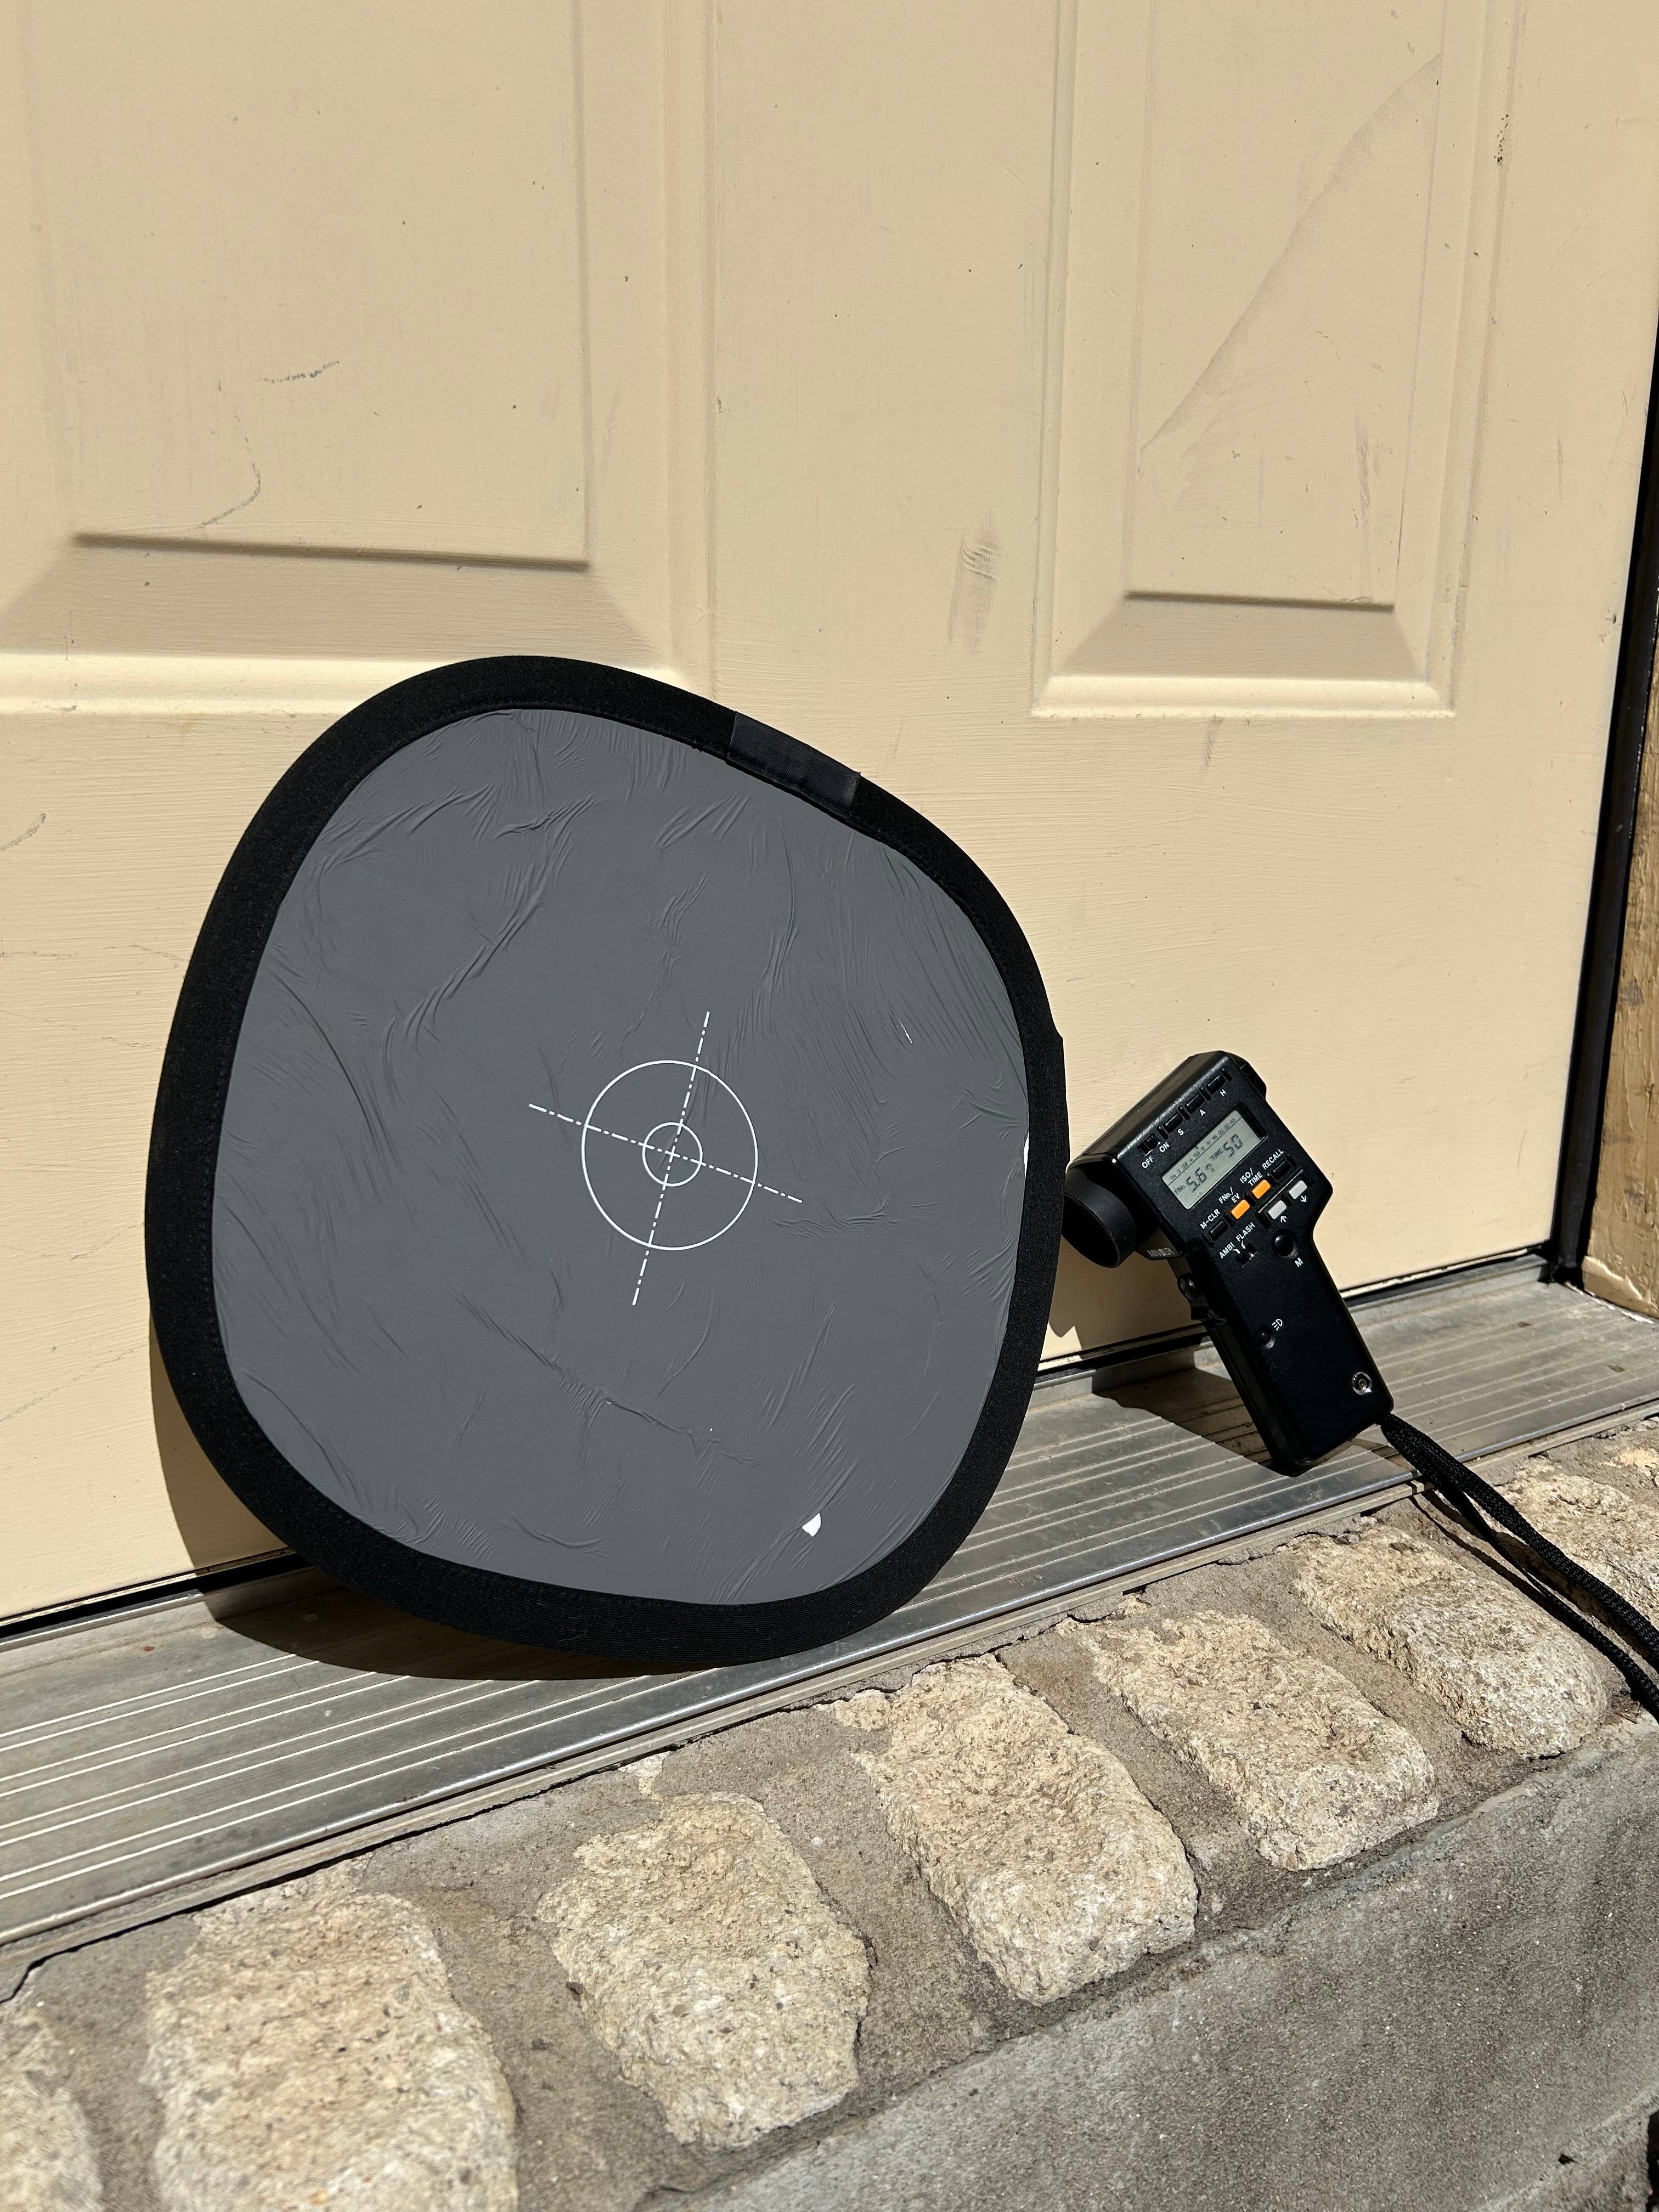
When I’m shooting with the motion picture camera, I tend to prefer to use an 18% gray card to calculate exposure. This particular color of gray is exactly what the meter is tuned to look for, and so it’s usually as simple as lighting the scene, metering off the card, and plugging the results directly into the camera.
Much to my relief, even set to ISO 6 (I cannot overemphasize how slow this—we’re nearing tintype/dry plate speeds here), the meter gave an aperture of T/5.6 at a shutter speed of 1/50s. This is actually a pretty decent middle ground—though far from being infinitely sharp across the depth of field, this is three full stops from being wide open on this particular lens. I decided to hedge even further and shoot with the aperture at T/8, which is one stop darker (as if I had metered at ISO 12, or in other words, adding only four stops of light to normal exposure as opposed to the suggested five).
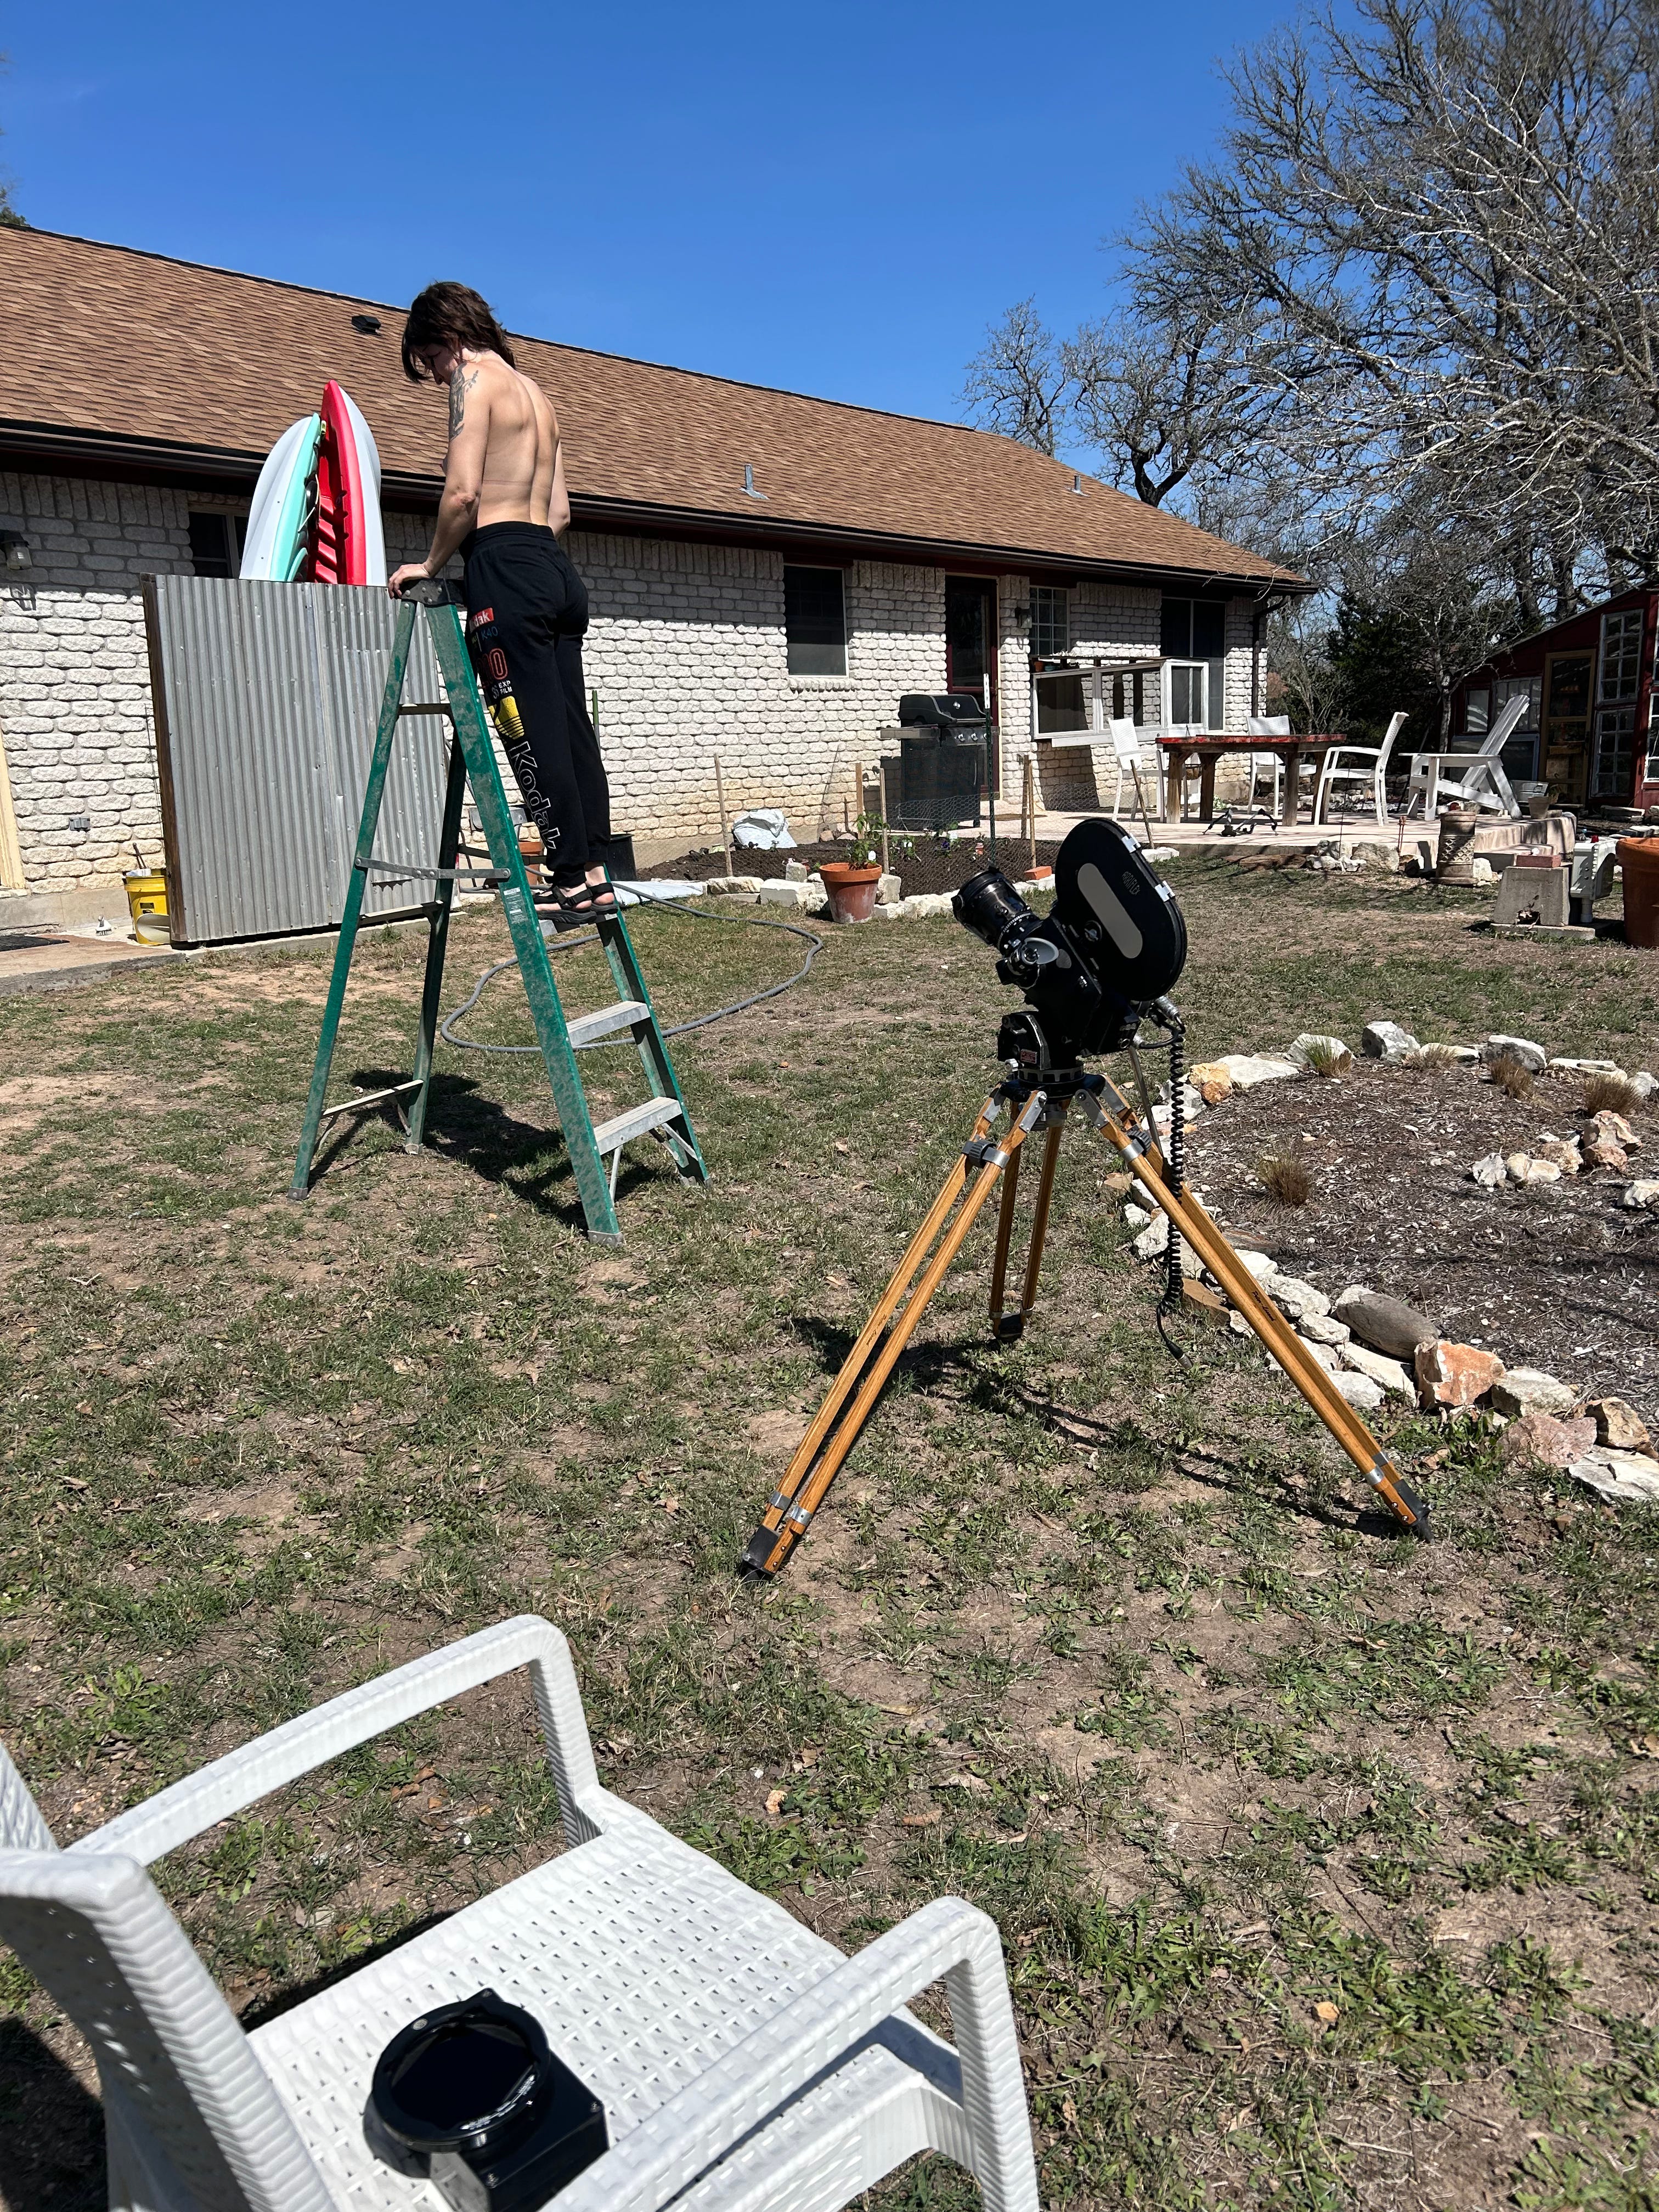
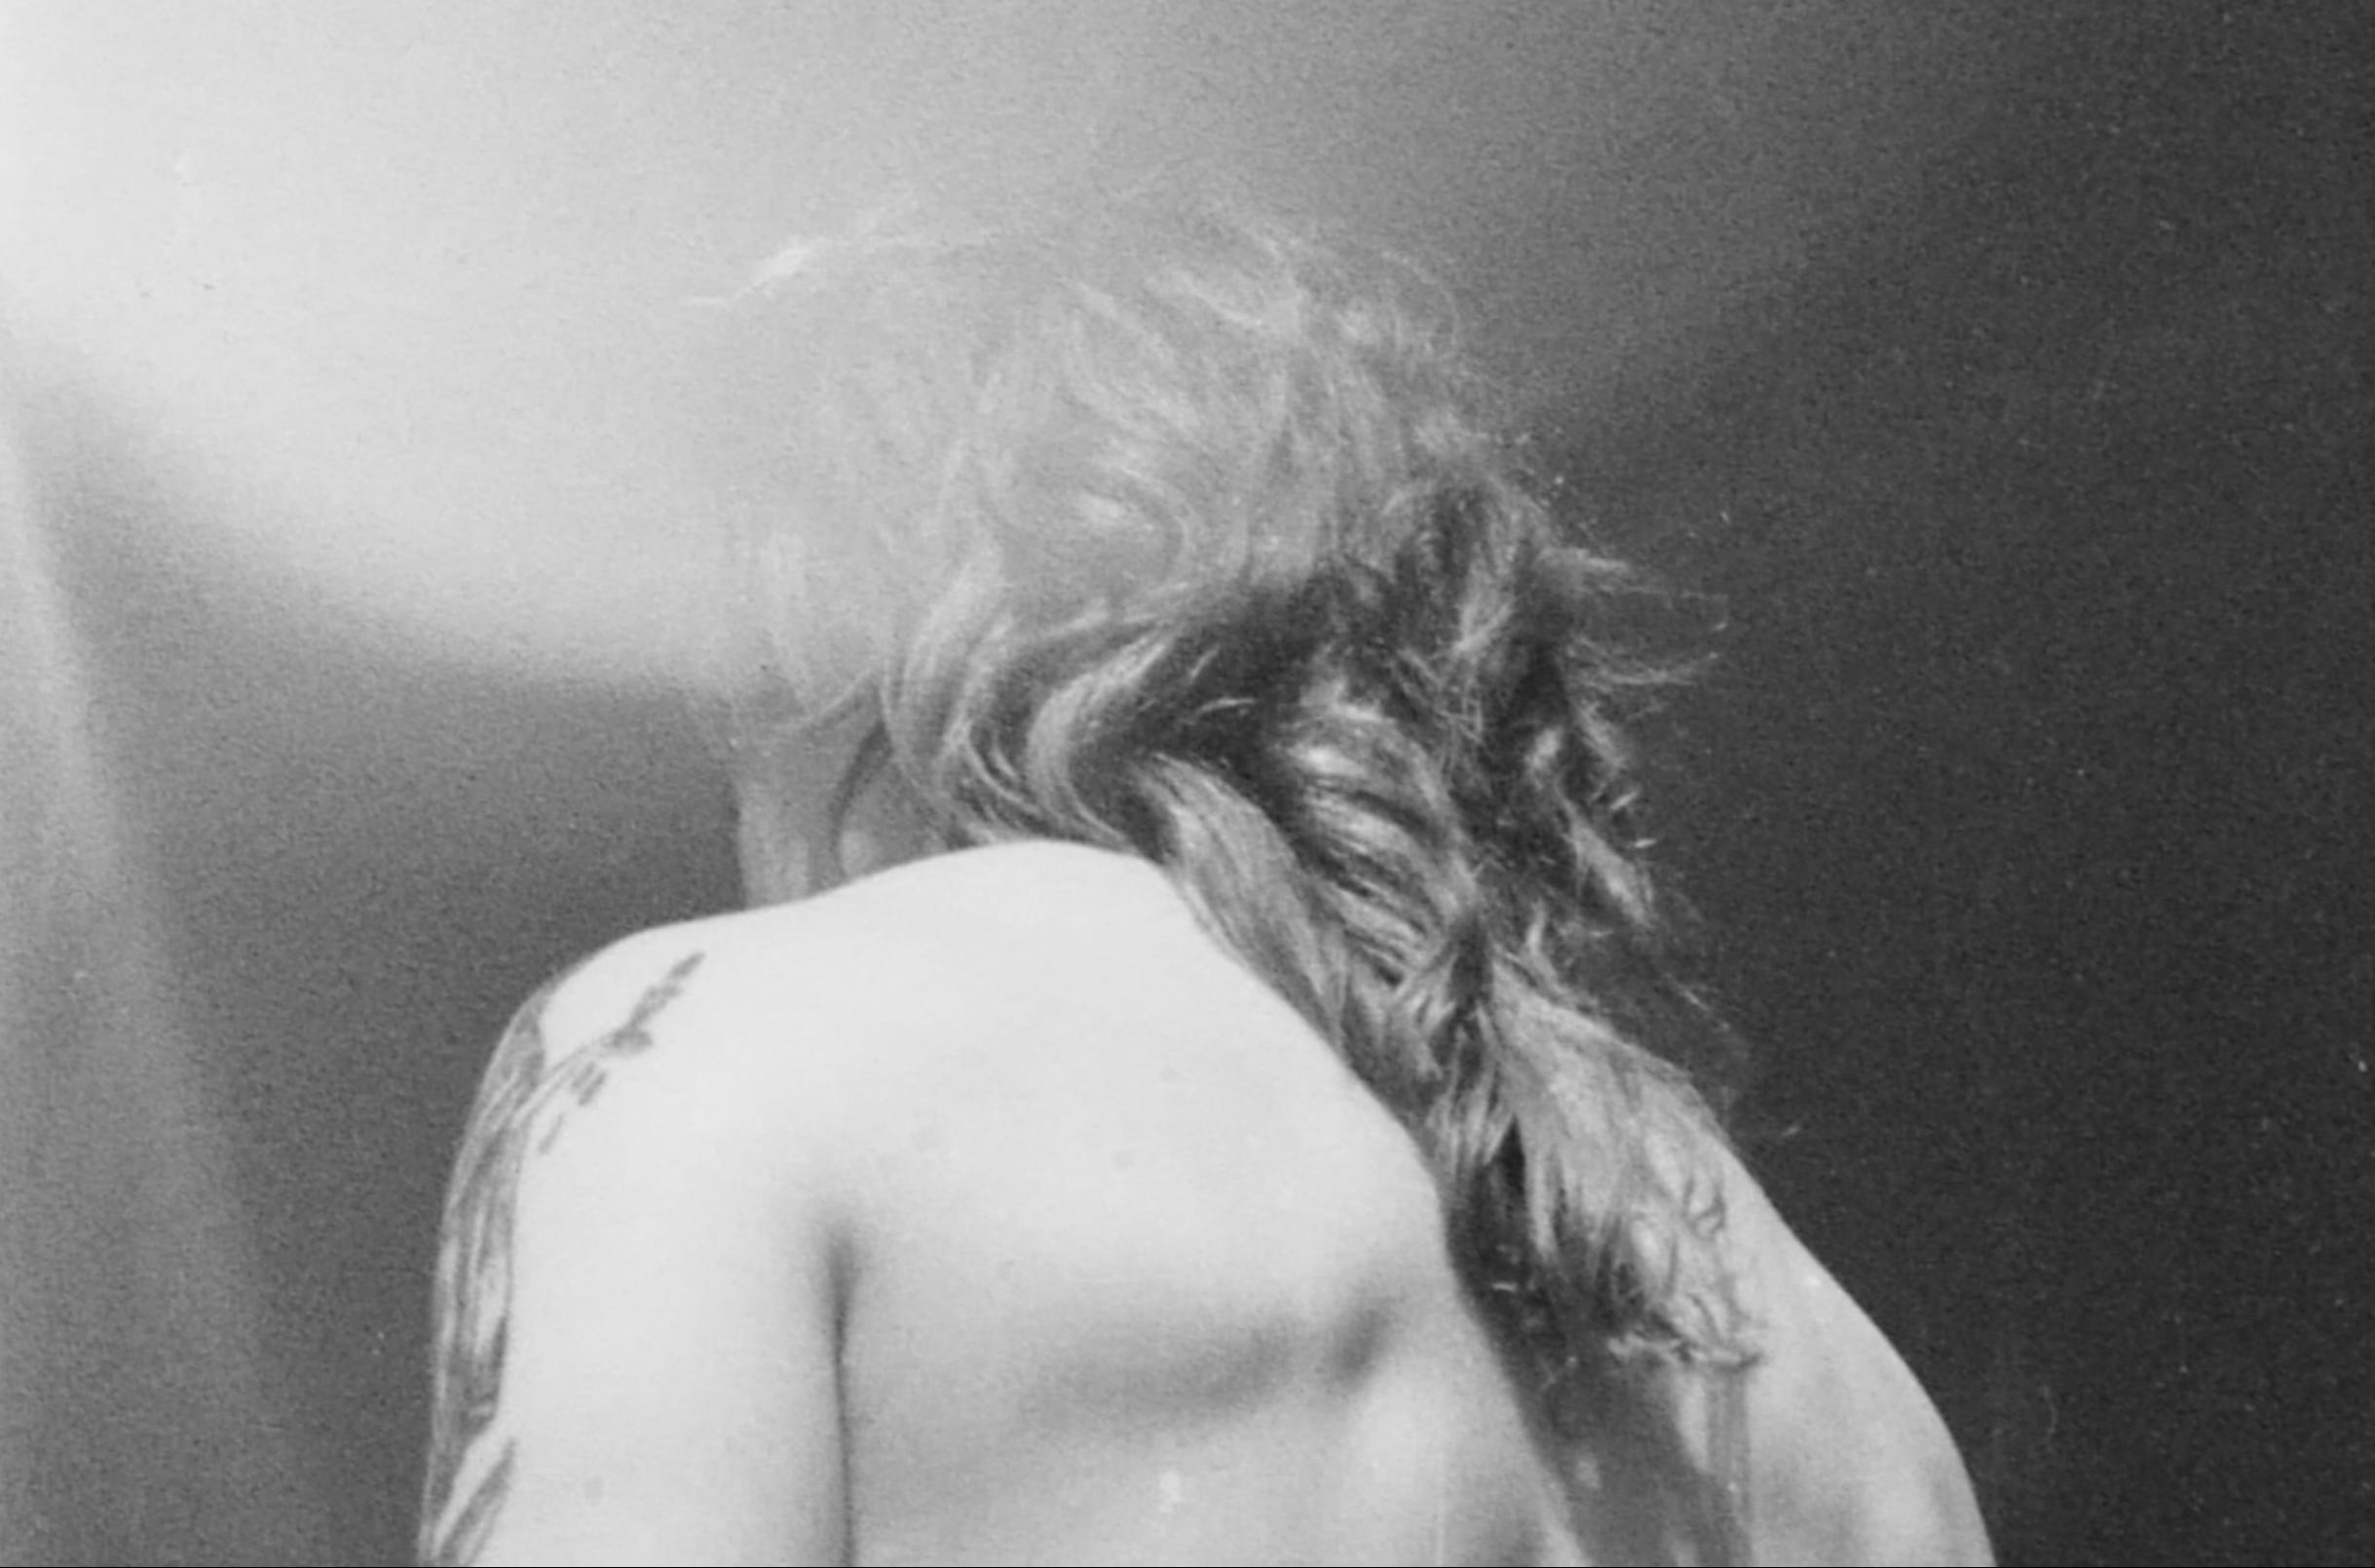
Bridgette’s back is looking pretty ripped these days, and I wanted to see if I could capture the statuesque, marble quality that infrared light gives to skin, as well as the dramatic darkness of a blue sky from which infrared light is not reflected practically at all. So I made her ascend a ladder with no shirt on.
It’s only the end of February, but in Texas it is already hot and the sun is bright—exposure values should get even better as we move into the brightest part of the year. However, it’s not so green out yet. For another shot, I had her sit in front of a cactus to see if that would give us the striking bright white foliage effect, but it didn’t really turn out. Though the cactus is green-ish, I don’t actually know if it has much chlorophyll in it or whether it reflects IR waves the way that green leaves and grass do.
Knowing that the amount of film (in length) that I could likely develop at home was limited, I gave myself only a few very quick, 2-second shots. I ended up with about ten feet of film to wrangle.
II. The Experiment: Development
I’ve been developing and scanning my still photographs at home for years now, and I’ve got a fair amount of equipment and chemicals at my disposal. My preferred B&W developer is HC110 (technically the off-brand Legacy Pro L110) for its long shelf life and predictable outcomes. I use Ilfostop as a stop bath to halt development and Ilford Rapid Fixer to fix the silver halides and clear the film base of emulsion.
Now, this isn’t a particularly scientific experiment. It’s not like I’m planning to develop miles of motion picture film at home in the near future, or ever. If I were trying to dial in a specific exposure and developer combination for this particular film, I would have done multiple exposures of the same scene with the same lighting, ideally including the gray card and/or a grayscale gradient chart, and I would have tested different times of development to try and find the most even and accurate result.
No, I just want an image—any image will do. A good starting point for HC110 in its Dilution B (1 part developer to 31 parts of water) is 6m30s, and that’s exactly what I did. I used a standard Jobo-style tank, normally used for 35mm and 120 format film, but I left out the spiral reels and the light trap and essentially treated it like a small bucket.
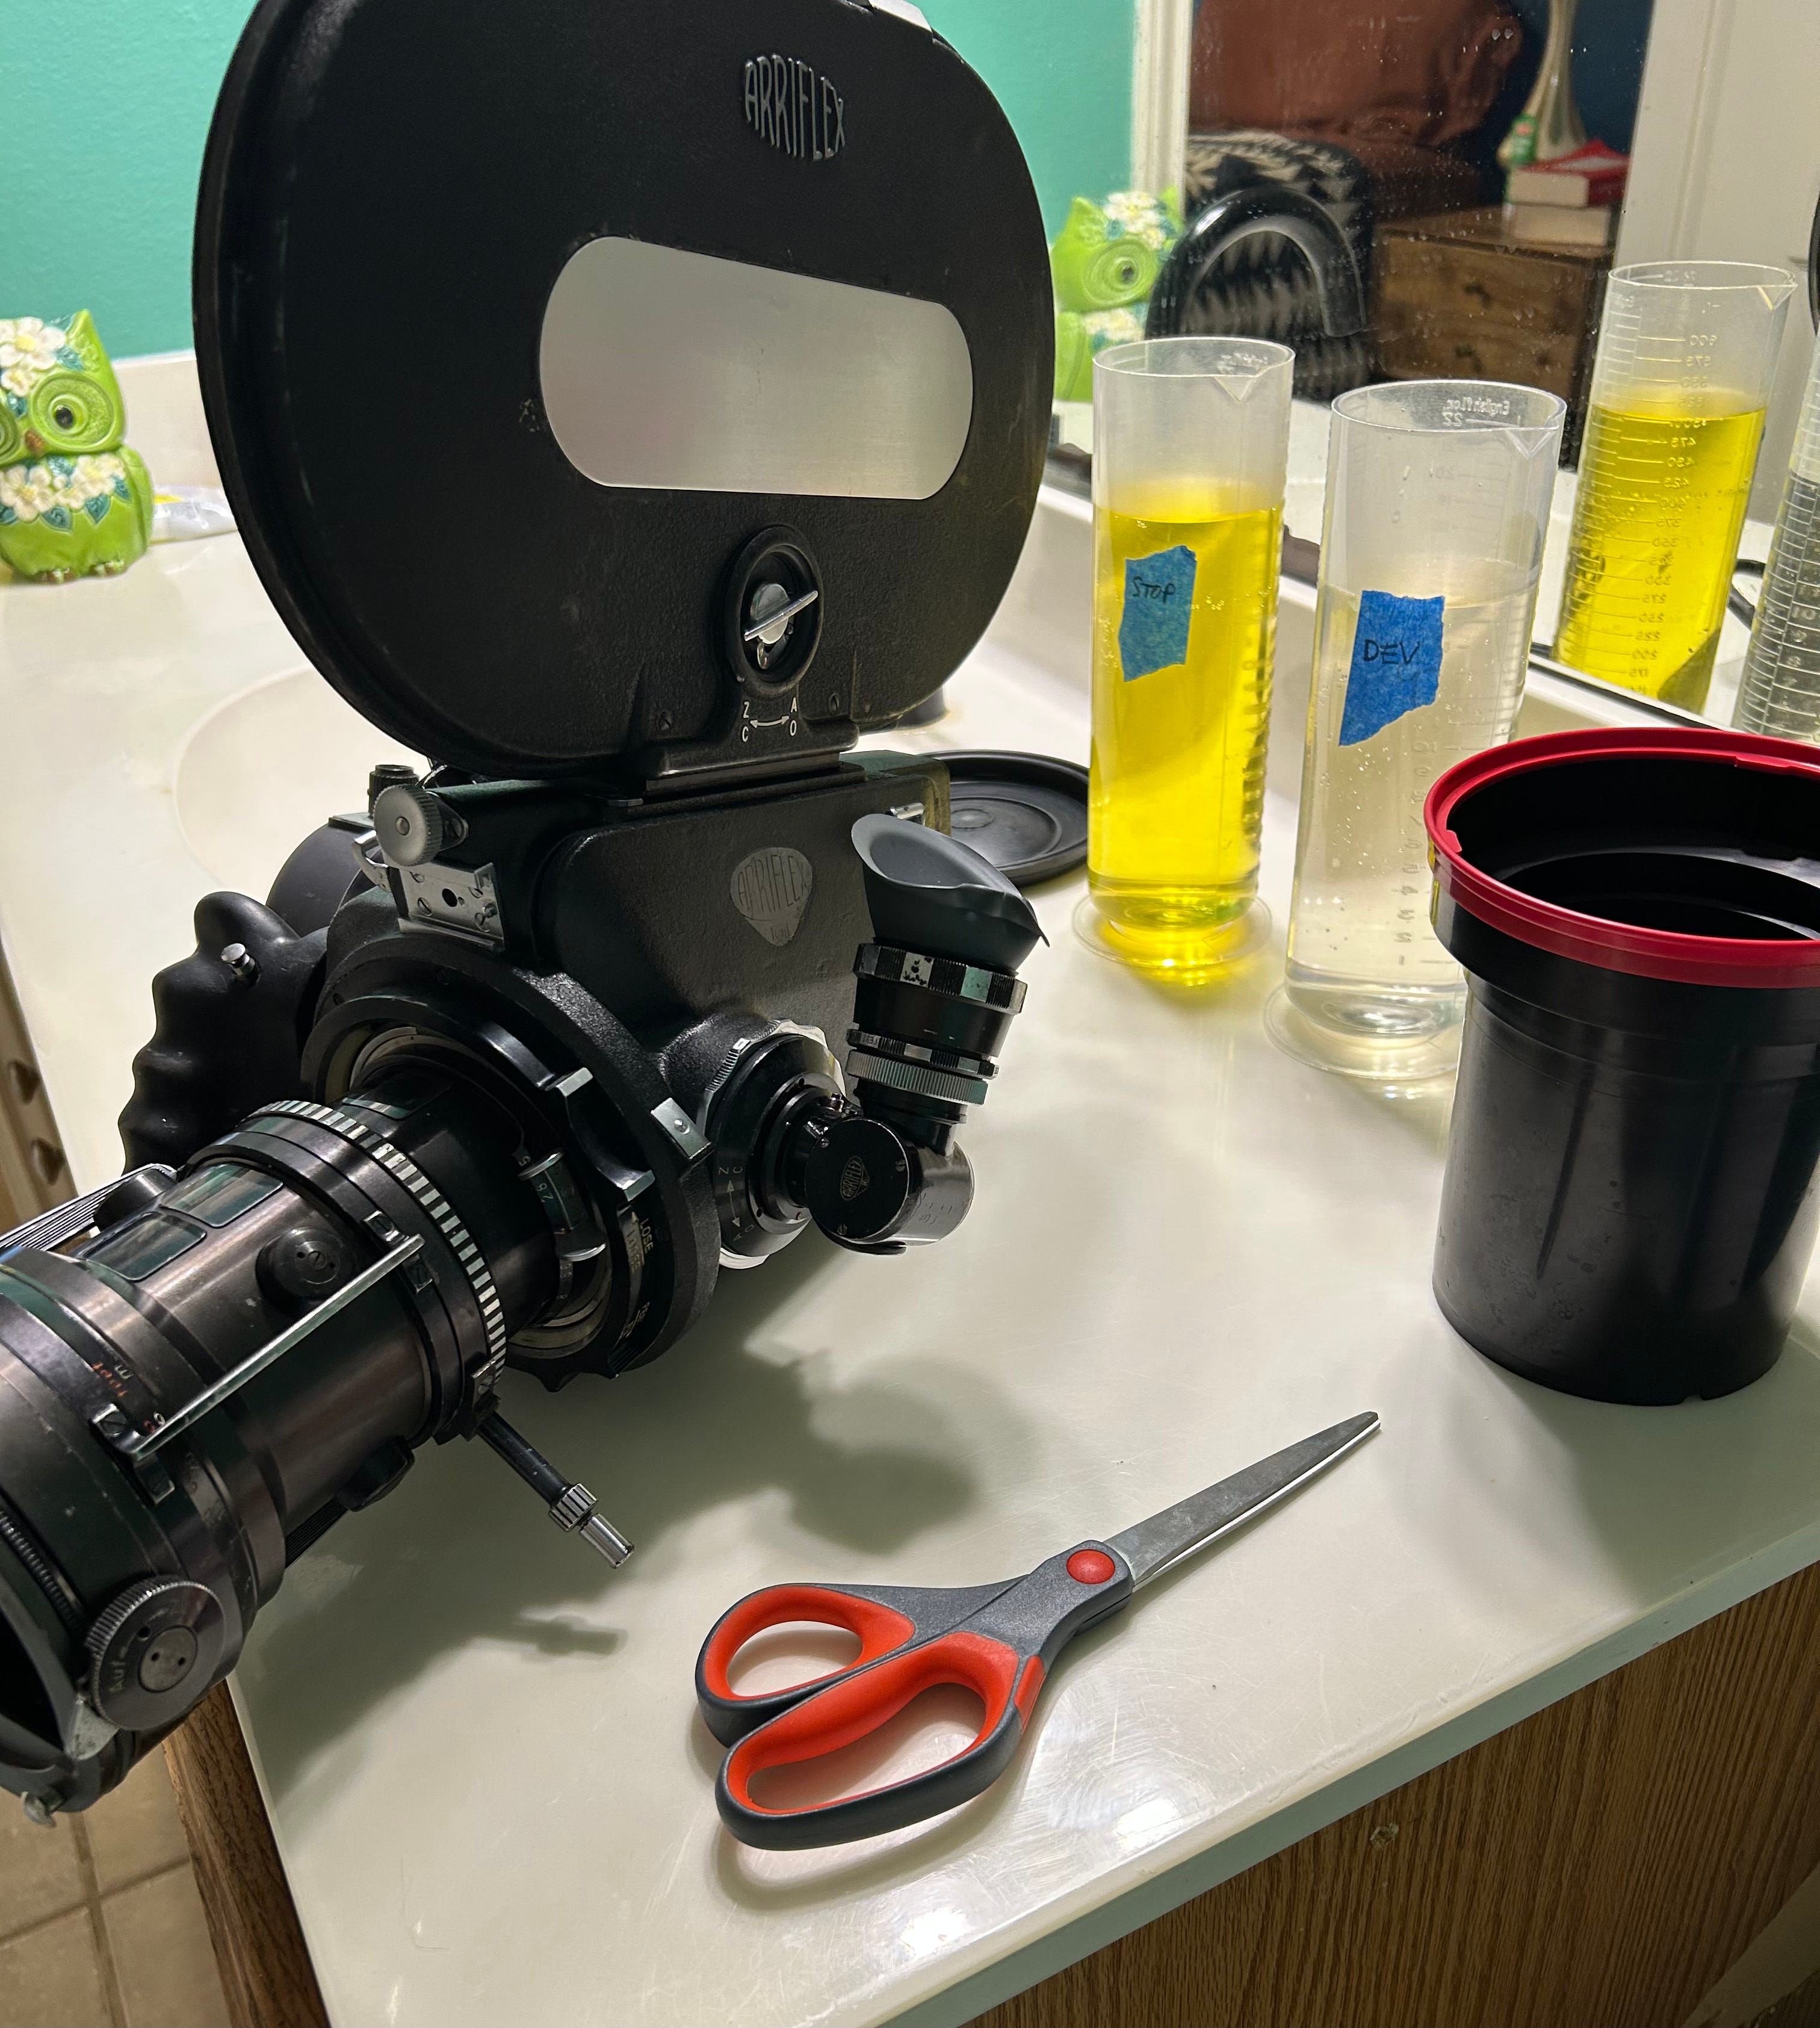
I did the whole process in the dark by hand. First I cut the film out of the camera and re-packaged the remaining unexposed reel. Then I took what I had exposed—about ten feet—and wound it around a couple fingers so I could drop it easily in the tank in the dark. I poured in the developer, and then agitated the film by hand, pulling it in and out of the bath for the entire duration of development, and occasionally popping the lid on the tank and doing some inversions. The idea was to get the developer all over the film and make sure none of it was stuck together. Normally in a tank like this, your film would be wound onto a spiral reel to take care of this aspect, but I just had one jumbled mass of film constantly dunking in and out of the bath. I wore gloves.
I finished development as normal using a stop bath and then five minutes of fixing, then I washed it off and hung it up to dry. With this, as in every other format, there are few feelings more exciting than seeing recognizable images on your negatives as they come out of the final wash. It worked!

III. The Experiment: Scanning
Take another gander at the above picture. You can make out the repeating frames—24 of them per second. About half of the length of film is hanging out of frame, nearly all the way to the ground. This is about 10 seconds of footage. The other reason I’m not about to start a motion picture development lab at my house, notwithstanding the sheer amount of chemicals and machinery needed to process, you know, minutes of the stuff at a time, is because you still need a way to scan it into the computer.
High-end lab scanners do a fabulous job of this process with little to no intervention on the part of the technician, after which they deliver a single .mp4 file at an outrageously high resolution. It’s well worth the cost of having film sent to the professionals to be developed and scanned. But today we’re doing this at home, and we need to capture each and every one of these frames if we want to see anything that remotely looks like a moving image.
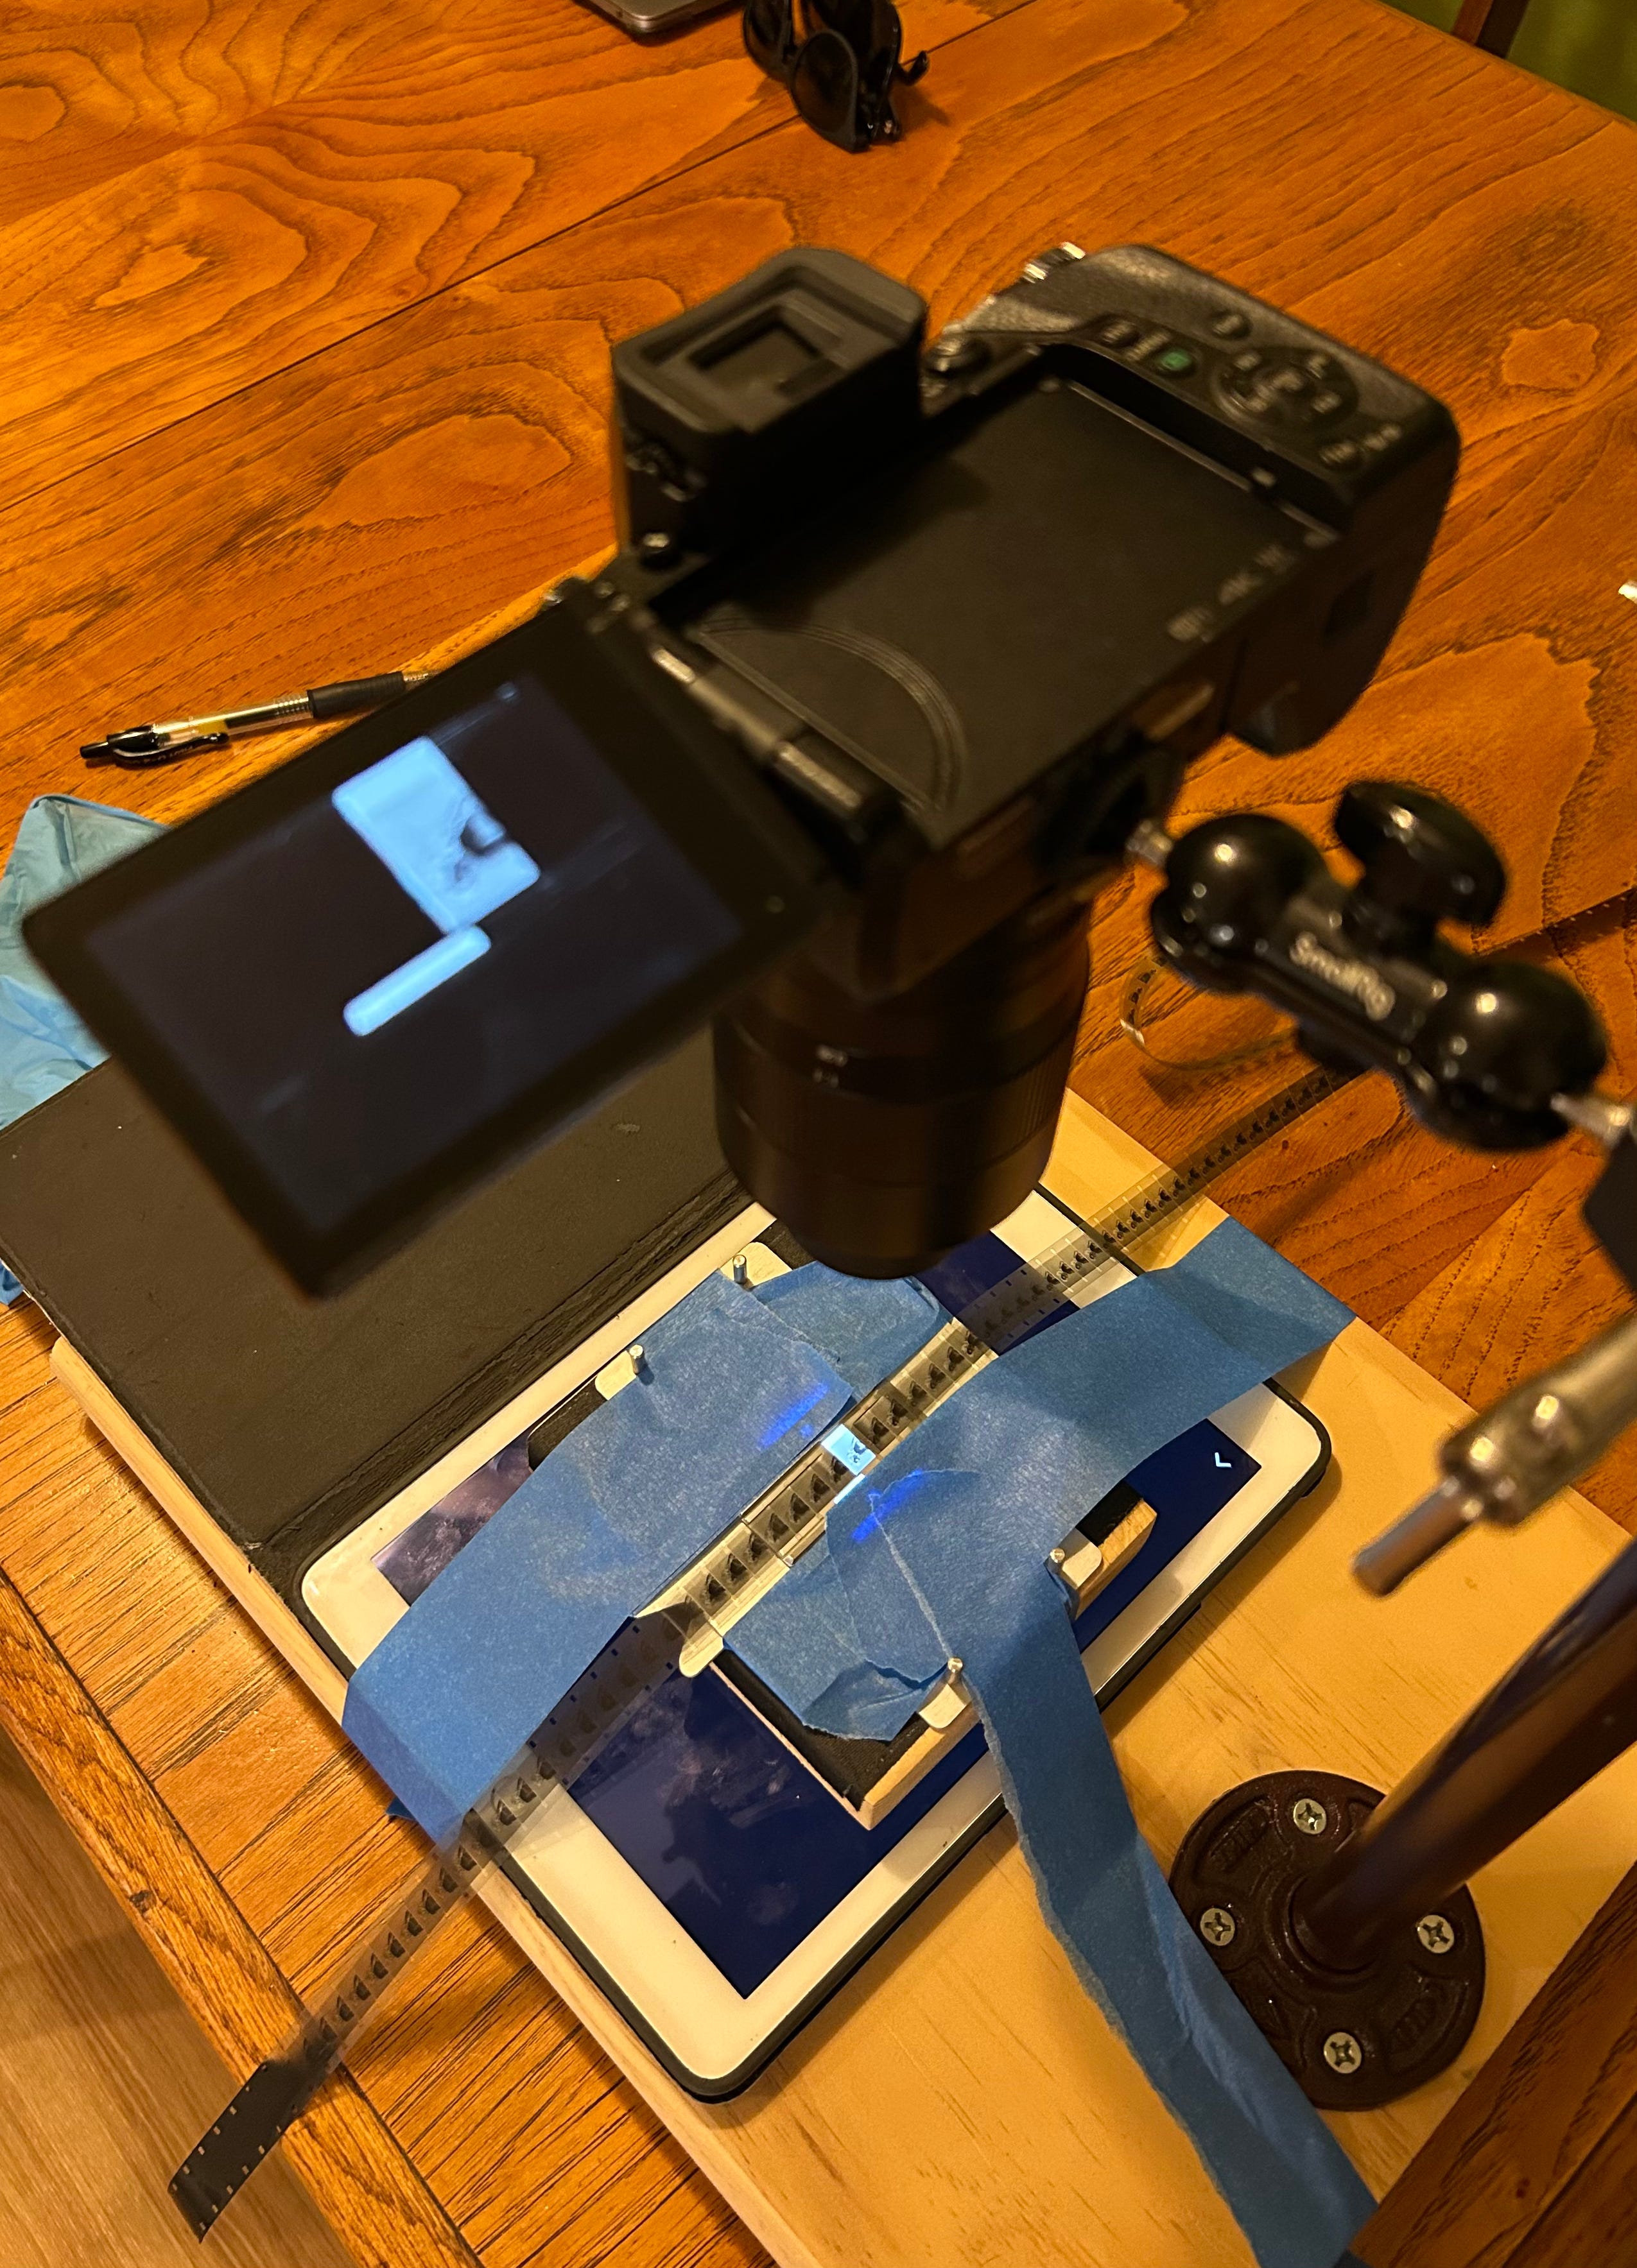
“DSLR scanning” is the process of using a digital SLR camera, usually with a macro lens, to simply take a picture of the negative. I have a copy stand that I’ve built for this purpose to digitize 35mm film. I use an iPad and a piece of an old enlarger to elevate the negative and illuminate it from below.
Fortunately I also have a spare 16mm gate, so I at least had something to keep the film aligned left-to-right. I would have to pull it through by hand and do my best to keep the perforations in the same spot each time. Minor variations, unavoidable, I hoped could be addressed in Final Cut Pro. Either way, this was going to be a one-frame-at-a-time process, so I set the auto-timer on the DSLR and got as comfortable as I could.
IV. Results
Well there it is. That image is a GIF—it should be moving for you. If you didn’t read the caption of the last pic, I’ll reiterate here: it took 25 minutes to scan 10 feet of film, totaling about 10 seconds of footage, 2 seconds of which are represented above.
But hey, we got it: alabaster skin; strangely dark sky which was in reality bright blue (see the setup shot a few paragraphs up). Dark, dark pupils. Lips and blemishes tend to disappear into the same color as the skin. I’m surprised the tattoo on her shoulder rendered at all. The focus isn’t tack-sharp—always somewhat of a concern on the tiny medium that is 16mm—but it’s better than good enough, and with how well-exposed the negative was, I daresay this film could be metered at ISO 25; put another way, I could have closed the aperture by one more stop of light and thereby increased the depth of field even more, locking in a deeper range of focus.
I trashed the cactus shot. It was blurry, and the cactus didn’t quite have the IR effect I had hoped it would. We did another shot of a zoom toward Bridgette against the sky from a different angle, but it came out very jumbled in the scan and at this point I was out of energy to really do anything about it. You can also tell just from that brief clip how banged up the film gets during “bucket style” development. At a lab, it would be placed onto gentle rollers that would slowly feed it into each chemical bath before coming out at the end to be dried.
But I’m not complaining: what a joy to shoot motion picture footage, from soup to nuts, all at home.
What’s this all about, anyway? In just three weeks I’m due to head to Joshua Tree, California—a typically sun-blasted place—and meet up with some Big Ego Records cohorts. There’s a record or two in the mix and, with luck, a film document to go along. This experiment is as far from the starting point as it is from the end.
Thanks for sharing. A very cool process that started halfway around the world! Looking forward to the music. Cheers!